ML is a distributed mail system for the X11 window environment. It is also one of the most powerful mail processing programs in existence. This power is always available for you whenever you need it, but hopefully doesn't get in your way if you don't require it.
Help information is provided for most every program
window. This is the first place to look when you have questions. Some
of these help files unfortunately may refer you to system
documentation. This is necessary occasionally; because this program
inter-operates with many other sub-systems which are already installed
on your computer system and which differ by manufacturer. If you have
questions which aren't answered anywhere, please address them to
"ML@CAMIS.Stanford.EDU".
If you are using the program for the first time, several steps may be necessary to configure the program for your use. You will need to use the Configure option from the Main Window's Option menu to define where your mailboxes are stored. You will also need to set your delivery information. To do this, select Send->Compose New from the Main Window. From the Compose Window, select Option->Configure to bring up the Compose Preferences menu. In the Main Window's Option menu are two other selections for setting various personal preferences and options.
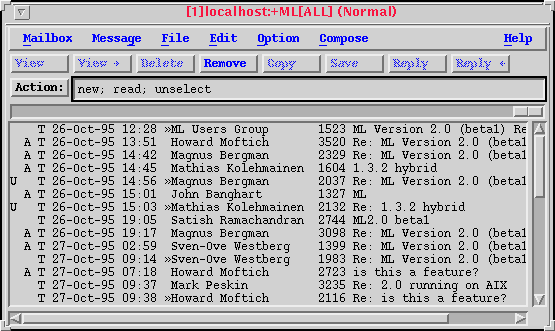
The window which brought you here is known as the Main Window, and is where your mailboxes will be displayed. You may have multiple Main Windows containing different mailboxes. The Main Window numbered [1] must remain open for the life of the program. Closing it will exit the program.
Occasionally, you may initiate actions within this program that require interaction from you before the program can continue. The reason for this is that the actions to be performed are based on a "snapshot" of the program at the time you initiated the action.
For example; let's say you wish to save a particular message to a file. Until you have selected what file to save the message to, you cannot be allowed to delete the message that you are trying to save from your mailbox (through an action performed in an entirely different window). It just wouldn't be a good idea...
In order to make sure nothing disastrous happens, the mouse and keyboard are occasionally allowed only to accept responses in a particular window. If you move outside that window, the cursor will change to a skull and crossbones, indicating that you must go back and complete what you started. You are always allowed to cancel the operation, and try it again later.
Think of the Main Window as your mailbox, although this isn't necessarily the case at all times. You may have many Main Windows, and they may contain different mailboxes and "virtual mailboxes", which are the results of applying an active filter to a mailbox.
If you have a mailbox open, you are presented with a list of messages. To select a message, use the mouse "select" button (normally the left button). If you double-click the select button quickly, the message will be read in a separate Read Window. Many message operations may be performed from this window, and you may select multiple messages for these operations. To select a range of messages, hold down the [shift] key while depressing the mouse "select" button, and drag the mouse through the messages of interest. Alternately, if you wish to exclude certain messages within the range, hold down the [ctrl] key while dragging or selecting messages. The difference in this mode of operation is that you may toggle any individual message to be unselected or selected within a given range.
The messages are displayed with the message flags, the message type, the arrival date, the sender, the size of the message, and the subject. If your operating system supports alternate languages, the dates shown and the message information may be translated to your native language and character set.
The title bar displays the current mailbox or logical view in effect, and an indication of the sort order in effect.
"Recent" indicates messages which arrived since the last time the mailbox was closed.
Message functions which you apply from this window such as "Save", "Print", "Pipe", and "Reply" are applied to the entire message, in the case of multipart messages with attachments. If you wish to access or perform operations on individual parts of a multipart message, it must be done from the Read Window.
If the number of messages in the window changes due to some operation, such as new messages arriving, messages expunged from the mailbox, or as the result of re-evaluating search filters, the scroll bar location will be reset. Performing operations on groups of messages at once, and setting the value of "Mail check interval" to a longer time (from the "Option Settings" menu (under Options), will minimize any disruptions to your work.
If your messages are displayed in normal order, the location will be set to the bottom of the message list when the list changes. For other sort modes, the location is set to the top.
%s, the messages will be
placed in a temporary file whose name will be placed in this location
when the command is invoked.
Sort
(Also note that the Compose Window contains additional preference information related to outgoing messages and delivery).
Message->View Selected
Message->View Selected except that a new Read Window
is created to display this message or messages.
Edit->Set Flags->Deleted
Mailbox->Remove Deleted
File->Copy To Mailbox
File->Save To File
Compose->Reply->To Sender
Compose->Reply->To All
The authentication window appears when you need to prove your identity to a server or any process which requires that it be able to identify you.
Authentication consists of two parts, a Username and a Password. Both of these should have been supplied to you and should be known to you already. There is no way in this program to register an identity or change your password. If you do not know this information, please contact your system administrator or Internet Service Provider for assistance.
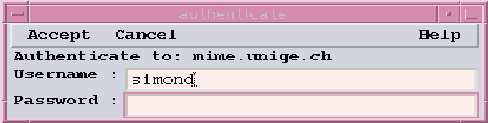
Figure 1.3: The Authenticate (Login) Window
While this window is active, it has control of the keyboard and mouse. You must select a window or cancel to continue the program or use any other windows (except for this help window).
Since logging in is so crucial an activity, this window has also been designed so that if you obscure it with another window, a timer is set to occasionally pop it into the foreground again.
Once you have entered a name (perhaps supplied by default) and a password, select Accept to initiate the authentication. Select Cancel if you do not wish to (or are unable to) login at this time.
There are two places in this program where you might be asked for authentication. In some cases, other authentication mechanisms might be in place, so you may not always be asked.
In each of these cases, this program will make the best guess as to what the Username should be for the service involved. If it is incorrect, you should change it. (You may also set this from the top-level Option->Configure menu so you don't have to always do this). You may or not have the same username and password for each service. Above the Username field is a line indicating which service and/or system is requesting your identity.
The password should be known only to you. You will not see it displayed when you type it in. Instead, you will see a row of asterisks. You may backspace and delete to correct it if you think you typed it incorrectly. You should never give your password to anybody else, or write it down, or put it in a file. This is a secret you must memorize and keep to yourself. Otherwise, somebody else might be able to masquerade as you, and could cause damage to your files or reputation.
This program will in a few cases store your login credentials (encrypted, of course - and only in memory; not in a file), so that you do not have to enter them again for the same service. It will then re-use this information instead of asking you repeatedly. This is generally the case with mailbox access on a single server. If you select another server, you will be asked again. You will not be able to "change identity" on a particular mail server because of this storage. If more than one person is likely to use this program connected to the same mail server, you must either retstart the program, or create a unique Server Configuration for each person desiring access. FTP logins are not stored in this manner.
Also, because of this storage, if the program ever terminates on you with a "core dumped" message, you should immediately remove the file named "core" from your home directory on the system running this program. Although your password is encrypted, the exact algorithm used isn't very secure, and is available to anybody who has program source code. If they can read the core file, a clever person can find out your password.
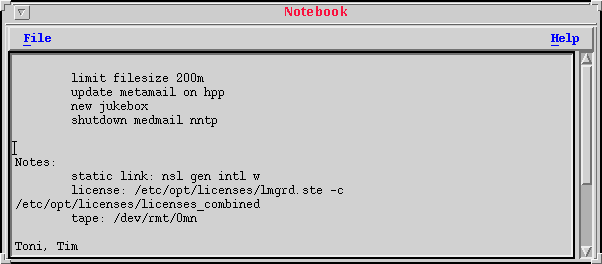
ML provides a general purpose notebook to do as you see fit with. It is basically a jot pad you can use for any information you wish to keep. It may also be used as a temporary storage location for cutting and pasting information between various system windows; which for whatever reason cannot share the screen at the same time.
Generally, people tend to keep large amounts of old mail online because there are items in the messages they need to remember or act on. Usually this information is only a few words; not the entire message. The notebook provides a place to put that information so that the messages may then be deleted (and also so you don't have to apply a filter to the entire mailbox to find it again). This is only one potential use. Other uses are limited only by your needs and imagination.
There are two selections within the File menu. menu. Save and
Close Window. Both will save the current contents of your notebook. It
would be wise to select Save after new information is entered so that
it will be saved in the event of a future system failure or abnormal
program exit; however there is an automatic timer which will save it
at preset intervals. The length of time between saves may be set from
the Main Window->Option->Option Settings dialog.
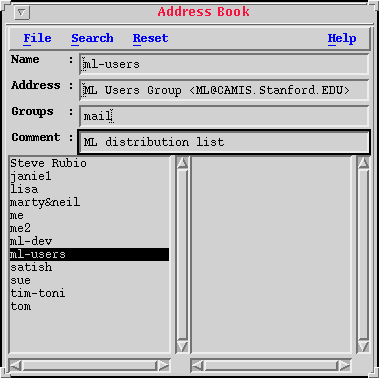
The Address Book stores commonly used addresses for you to refer to or use in your composed messages. In addition, you can search on any of the address fields. An address book entry consists of:
There are two list windows shown. The one on the left contains your entire address book. The one on the right is filled in as the result of searches. It will only contain matching entries from the last search operation. If you select a list item (either list), you will be able to modify it or remove it from your address book. You can only Add an entry starting from a fresh empty window (nothing currently selected). The Reset button may be used to clear the current selection and reset the window state.
To search for an item, enter what you are searching for in the appropriate text field, and select the Search button. Any matching text from ANY address book entity will be returned in the search result list. Matches are not case sensitive, so "me" will match any of "ME", "Me", "me".
They are also not position sensitive, so a search for "ich" will find "Richard" and "Jericho". Any of the four text input fields may be used for the search. Any field which produces a match will be displayed.
To use an address entry in a compose window address field, type enough of the Name part of the entry to make it unique, and hit the [tab] key. The Address part of the entry will be filled in for you. As you become more familiar with this use, you will find that short, unique names containing no spaces work best for this completion.
To use a group name in a compose window address field, type a complete group name, and hit the [tab] key. The Address part of the entry for each Address Book entry containing that group name will be filled in for you. Group entries take precedence in completion, but must be matched completely. If no group entries are found, an attempt is then made to match the (partial or complete) Name.
You may also "drag" a name from either of the lists into a compose address field, and hit the [tab] key while the cursor is positioned somewhere within the name which was dragged. Generally the middle mouse button performs a list "drag" operation.
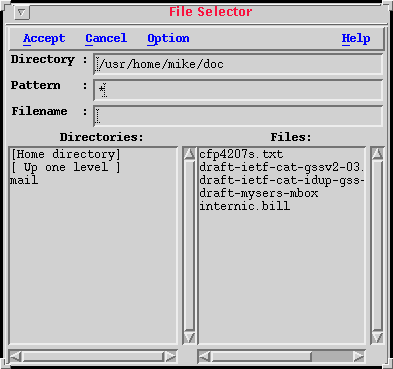
Figure 1.6: The File Selector Window
You have been requested to supply the program with a filename. The file selector window is used to make that choice. The actual filename which will be used is a combination of the contents of the Directory text field and the Filename text field. These files are located on the system which is executing this program, which may or may not be the same system on which you are displaying it.
You may override the Directory field completely by supplying an absolute pathname in the Filename text field. - One that begins with a forward slash character.
Selecting Accept (or hitting [return] or [Tab] in the Filename text field), OR double-clicking a filename, indicates you are finished making the selection, and it will be used. Selecting Cancel will cancel whatever operation you were performing which asked for a filename.
A single click (selection) of a filename entry will make that the currently selected file, which you may then edit before selecting Accept. Selecting a directory entry will open that directory and display a new list of directories and filenames (if any exist).
Please note that if the operation which requested this filename is one which "writes" to that file, and you supply a name which already exists on the system, the existing file will be destroyed by the write operation. Generally, you will only select filenames from the list to "read" or insert them. For writing files, you should type in a name which doesn't already exist on the Filename line, unless you intentionally plan to destroy the existing file. In any event, you will be asked to confirm the file destruction before it is actually carried out.
At any time, you may change directories either by typing in a new directory name in the Directory text field and hitting either [return] or [Tab], or by single-clicking in the "Directories" list. Two entries will always be present in the Directories list; your "home directory", and the parent directory of the current one. Selecting either of these will go to the appropriate directory.
The filenames listed are those which match the text in the
Pattern text field. This corresponds to a Unix wildcard pattern which
you can use to select a subset of the availables files.
Generally this will be set to an asterisk "*", or all files.
In some functions, such as saving or loading message drafts, it
will be set to something else, such as "*.draft", so that only those
files are listed which end in ".draft". To filter the directory
contents, enter the desired search pattern in the Pattern field, and hit
[return]. The file list will be refreshed according to the pattern.
Directories are always included in the display regardless
of the filter pattern. A detailed explanation of Unix wildcards is
rather lengthy. Here are the important details:
*
Matches any combination of characters with anything
?
Matches a single character position with anything
[]
Matches the characters within the brackets exactly;
these may be a range, such as "[a-z]", which will match
any lower-case characters in a single text position.
[^]
If the first character within brackets is "^",
negate the match. In this case, any characters EXCEPT those within the
brackets will match.
Anything else within a pattern is matched exactly. For
instance, "*.text" will match anything that ends with ".text".
(The quotes are added for illustration only and are not part of the
pattern).
"*.??t" will match any name which contains a period, has
three characters after the period, and which ends in "t". "*.[ao]"
will match any name whose filename extension is ".a" or ".o", but
it won't match other filename extensions such as ".c".
Additionally, under the Options menu, you are given the choice of including so-called "dot files" in the listing. The default is to ignore them, as they are generally hidden. This involves any filename whose first character is a period. You may at any time type in a name on the Filename line without regard to whether or not it is a hidden file.
You are being asked to supply the name of a command to execute in order to view or otherwise process a particular attachment type.
Hopefully, your mail system has been configured with a set of default commands for most of the commonly used attachment types. If one of these is displayed, select Accept to launch the program, but first see the note below on stopping the external program. If there is no default program, and you have no idea how to proceed, select Cancel, which will then prompt you for a filename in which to save the message attachment. If the attachment is of type "message" or "text", you may use the string "MLVIEWER" to display the contents in an ML text window.
The following discussion is somewhat technical in nature, because the external program is totally arbitrary, and this program has no way of knowing the exact details required for its operation.
The command to be executed is launched using the system shell (normally "/bin/sh") - which doesn't usually recognize the same syntax as the typical login shell. For instance, the character " " is usually not interpreted by the system shell to refer to a home directory. There are other minor differences, but this one is the most noticeable; and likely to cause some confusion. If in doubt, please refer to your system documentation, or seek the advice of a knowledgeable administrator.
If you supply a simple command name, the contents of the
message will be supplied to that command via the standard input
channel, which would otherwise be the keyboard. If the command
requires a filename to operate, you should place the sequence %s
within the command string, which will be replaced with the name of a
temporary file which will be created to hold the message
attachment. Only one %s is allowed in a command, and there should be
no other % characters.
Do not run these commands in the background with "&" when
using a temporary file, because this program will resume and remove
the temporary file before the external command has a chance to access
it.
If the external program requires terminal interaction, such as keyboard input, you should preceed the command with an appropriate sequence to launch an interactive terminal such as "xterm -e ".
If a default command has been supplied, and you do not know the details of how to stop it, it would be better to select Cancel at this time, and save the attachment to a file instead. You can experiment with it later from an interactive terminal, and not affect your normal mail processing. Your normal mail processing will not resume until the external command has completed normally and/or has been terminated through some means.
Since the program to be executed runs completely on its own, in the event the sub-program refuses to quit normally, steps will need to be taken to stop or kill the program from an interactive terminal window or through other means. This program has no way of controlling the sub-program other than to start it running and supply an attachment to it.
Most of the functions in this program were designed to be used with a mouse or other pointing device, however in most cases, the functions are available via the keyboard. What exact keys this takes is dependant on many factors beyond this program's control, but some general guidelines should suffice for most situations.
Menu buttons are generally selected by moving the cursor over the button and pressing the "Select" mouse button. In most cases this will be the left button. If the menu is a "pull down" type, you may keep the button depressed while navigating through the menu to the item of interest, and then releasing the button. If you simply release the button, the pulldown menu will remain on the screen and you may then select an item from that menu by again pointing to an entry and clicking the "Select" button.
Menu buttons are generally available from the keyboard as
well, if they contain an underlined letter within the menu label.
This is generally selected by pressing both the "Alt" key and the menu
letter at the same time. On pull down menus, once this is
accomplished, the menu will appear and stay there. At that point you
do not need the "Alt" key to select items within that menu. Just the
letter corresponding to the menu item. Generally the "Esc" key will
cancel a menu pulldown.
On many systems, you may be required to use a different key
than "Alt"; which may be labelled "Meta" or may have a funny symbol on
it. In most of this documentation, the terms "Alt" and "Meta" are
frequently interchanged. Use whatever works for you. It is also noted
that on some PC 'X' displays, there are two "Alt" keys; one on each
side of the spacebar, and the one on the left is used by the local
window system. The one on the right is given to 'X'. You may need to
consult your system documentation to find out what key has been
designated for 'X' as an "Alt" key.
If you can't get a menu selection using "Alt" or "Meta", there
is a last resort; which is the F10 key. This will usually highlight
the first menu item on the window. Once highlighted, you can use the
cursor keys (left, right, up, and down) to select a particular menu
item. Again, use "Esc" to cancel the selection.
Some keys on certain menus will be labelled with
"accelerators". These indicate key sequences which can
activate the desired function without using the menu at all. Just enter the
appropriate key sequence anywhere in the window. The labels for these
go by the same rules just described regarding "Alt" and "Meta".
This program also uses a notation such as "^ALT-X"
in some places to indicate that you must use "Shift+Alt+x"
to access the function.
Selections in list items such as the mailbox message list are generally made by moving the mouse to the item of interest and depressing and releasing the Select button.
In most windows which contain lists, there is also an action applied for a "double-click". This is accomplished by pressing and releasing the Select button rapidly two times. (It also may take some time to get the hang of it, since the timing is crucial).
The Main Window is the only window at this time which supports multiple selections. In all of the other lists available, only a single item may be selected at a time.
Making another selection deselects any current items, and selects the new one. Selecting the same item again clears all selections.
In the Main Window you may select as many items as you wish. There are several ways of doing this. First you may make a single selection as described above.
Next, you may selected a "range" of contiguous items. To do
this, place the cursor over the first item in the range, press the
Select button, and drag the cursor through the desired items,
releasing the select button when you've reached the appropriate
endpoint. The same may be accomplished by selecting a single item,
then pressing the "Shift" key while selecting the last item. All of the
intermediate items will be selected.
To select or deselect non-contiguous items, hold down the CTRL
key while making selections. This allows to you select any individual
items, and if you select one that is already selsected, it will be
deselected.
The following keyboard mapping applies to most every text
input window in the program. See the notes above on "Meta" and "Alt".
| Ctrl A | beginning-of-line |
| Ctrl B | backward-character |
| Ctrl D | delete-next-character |
| Ctrl E | end-of-line |
| Ctrl F | forward-character |
| Ctrl G | process-cancel (unused currently) |
| Ctrl H | delete-previous-character |
| Ctrl K | delete-to-end-of-line |
| Ctrl S | search-text |
| Ctrl W | cut-clipboard |
| Ctrl Y | paste-clipboard |
| Meta B | backward-word |
| Meta D | delete-next-word |
| Meta W | copy-clipboard |
| Meta F | forward-word |
| Meta Left | backward-word |
| Meta Right | forward-word |
| Meta BackSpace | delete-previous-word |
| Meta Delete | delete-next-word |
| Ctrl N | next-line |
| Ctrl P | previous-line |
| Ctrl V | next-page |
| Meta V | previous-page |