Recapping programming basics
In this chapter we briefly recap a few concepts we became familiar with in Part 1. You can familiarize yourself with the programming basics course material here.
Program, commands and variables
A computer program consists of a series of commands that a computer runs one at a time, from top to bottom. The commands always have a predefined structure and semantics. In Java - the programming language we use in this course - the commands are read from top to bottom, left to right. Programming courses are traditionally started by introducing a program that prints the string Hello World!. Below is a command written in Java that prints the Hello World! string.
System.out.println("Hello World!");
In the command the method println - which belongs to the System class - gets called, which prints the string passed in to it as a parameter, and after that a linebreak. The method is given the string Hello World! as a parameter; consequently the program prints out Hello World! followed by a linebreak.
Variables can be used as part of the functionality of the program. Below is a program which introduces the variable length of the integer type. The value 197 is set to this variable on the next line. After this the value 179 of the variable length is printed.
        int length;
        length = 179;
        System.out.println(length);
The execution of the program above would happen one line at a time. First the line int length; is executed, in which the variable length is introduced. Next the line length = 179; is executed, in which we set the value 179 to the variable that was introduced on the previous line. After this the line System.out.println(length); is run, in which we call the print method we saw earlier. To this method we give the variable length as a parameter. The method prints the content - the value - of the variable length, which is 179.
In the program above we really wouldn't have to introduce the variable length on one line and then set its value on the next. The introduction of a variable and setting its value can be done on the same line.
int length = 179;
When executing the above line, the variable length is introduced and as it is introduced the value 179 is set to it.
In reality all information within a computer is represented as a series of bits - ones and zeros. Variables are an abstraction offered by the programming language with which we can handle different values more easily. The variables are used to store values and to maintain the state of the program. In Java, we have the primitive variable types int (integer), double (floating-point), boolean (truth value), char (character), and the reference variable types String (character string), ArrayList (array), and all classes. We'll return to primitive data type variables and to reference type variables and their differences later.
Comparing variables and reading input
The functionality of programs is built with the help of control structures. Control structures make different functions possible depending on the variables of the program. Below, an example of an if - else if - else control structure, in which a different function is executed depending on the result of the comparison. In the example a string Accelerate is printed if the value of the variable speed is smaller than 110, the string Break if the speed is greater than 120, and the string Cruising in other cases.
int speed = 105;

if (speed < 110) {
    System.out.println("Accelerate");
} else if (speed > 120) {
    System.out.println("Break");
} else {
    System.out.println("Cruising");
}
Because in the example above the value of the variable speed is 105, the program will always print the string Accelerate. Remember that the comparison of strings is done with the equals method that belongs to the String class. Below is an example in which an object created from Java's Scanner class is used to read the input of a user. The program checks if the strings entered by the user are equal.
Scanner reader = new Scanner(System.in);

System.out.print("Enter the first string: ");
String first = reader.nextLine();

System.out.print("Enter the second string: ");
String second = reader.nextLine();

System.out.println();

if (first.equals(second)) {
    System.out.println("The strings you entered are the same!");
} else {
    System.out.println("The strings you entered weren't the same!");
}
The functionality of the program depends on the user's input. Below is an example; the red text is user input.
Enter the first string: carrot
Enter the second string: lettuce

The strings you entered weren't the same!
Loops
Repetition is often required in programs. First we make a so-called while-true-break loop, which we run until the user inputs the string password. The statement while(true) begins the loop, which will then be repeated until it runs into the keyword break.
        Scanner reader = new Scanner(System.in);

        while (true) {
            System.out.print("Enter password: ");
            String password = reader.nextLine();

            if (password.equals("password")) {
                break;
            }
        }

        System.out.println("Thanks!");
Enter password: carrot
Enter password: password
Thanks!
You can also pass a comparison to a while loop instead of the boolean true. Below, the user input is printed so that there are stars above and below it.
        Scanner reader = new Scanner(System.in);

        System.out.print("Enter string: ");
        String characterString = reader.nextLine();

        int starNumber = 0;
        while (starNumber < characterString.length()) {
            System.out.print("*");
            starNumber = starNumber + 1;
        }
        System.out.println();

        System.out.println(characterString);

        starNumber = 0;
        while (starNumber < characterString.length()) {
            System.out.print("*");
            starNumber = starNumber + 1;
        }
        System.out.println();
Enter string: carrot
******
carrot
******
The example above should make you feel a little bad inside. The bad feelings are hopefully because you see that the example violates the rules learned in the programming basics. The example has unneccessary repetition which should be removed with the help of methods.
In addition to the while-loop we also have two versions of the for-loop at our disposal. The newer for-loop is used for going through lists.
        ArrayList<String> greetings = new ArrayList<String>();
        greetings.add("Hei");
        greetings.add("Hallo");
        greetings.add("Hi");

        for (String greet: greetings) {
            System.out.println(greet);
        }
Hei
Hallo
Hi
The more traditional for-loop is used in situations similar to where you would use a while-loop. It can, for example, be used to go through arrays. In the following example all values in the array values will be multiplied by two and then finally printed using the newer for-loop.
        int[] values = new int[] {1, 2, 3, 4, 5, 6};

        for (int i = 0; i < values.length; i++) {
            values[i] = values[i] * 2;
        }

        for (int value: values) {
            System.out.println(value);
        }
2
4
6
8
10
12
The traditional for-loop is very useful in cases where we go through indices one at a time. The loop below will go through the characters of a character string one by one, and prints the character string Hip! every time we encounter the character a.
        String characterString = "saippuakauppias";
        for (int i = 0; i < characterString.length(); i++) {
            if (characterString.charAt(i) == 'a') {
                System.out.println("Hip!");
            }
        }
Hip!
Hip!
Hip!
Hip!
Methods
Methods are a way of chopping up the functionality of a program into smaller entities. All Java programs start their execution from the main program method, which is defined with the statement public static void main(String[] args). This statement defines a static method - that is a method which belongs to the class - which receives a character string array as its parameter.
The program defines methods to abstract the functionalities of the program. When programming, one should try to achieve a situation in which the program can be looked at from a higher level, in such a case the main method consists of calls to a group of self-defined, well-named methods. The methods then specify the functionality of the program and perhaps are based on calls to other methods.
Methods that are defined using the keyword static belong to the class that holds the method, and work as so-called support methods. The methods that are defined without the keyword static belong to the instances - the objects - created from the class and can modify the state of that individual object.
A method always has a visibility modifier (public, visible to 'everyone', or private, only visible within its class), a return type (in the main method this is void, which returns nothing) and a name. In the following code we create a method which belongs to a class, public static void print(String characterString, int times). This method prints a character string the defined amount of times. This time we use the method System.out.print, which works just like System.out.println, but doesn't print a linebreak.
        public static void print(String characterString, int times) {
            for (int i = 0; i < times; i++) {
                System.out.print(characterString);
            }
        }
The method above prints the character string it receives as a parameter an amount of times equal to the integer - which was also passed in as a parameter.
In the section on loops we noticed that the code had some nasty copy-paste stuff in it. With the help of methods, we can move the printing of stars to a separate method. We create a method public static void printStars(int times), which prints the amount of stars it receives as a parameter. The method uses a for loop instead of a while.
        public static void printStars(int times) {
            for (int i = 0; i < times; i++) {
                System.out.print("*");
            }
            System.out.println();
        }
When making use of a method, our previous (and hideous) example now looks like the following.
        Scanner reader = new Scanner(System.in);

        System.out.print("Enter characterString: ");
        String characterString = reader.nextLine();

        printStars(characterString.length());
        System.out.println(characterString);
        printStars(characterString.length());
Class
Methods can abstract a program up to a certain point, but as the program becomes larger it's sensible to chop down the program even further into smaller and more logical entities. With the help of classes, we can define higher level concepts of a program and functionalities related to those concepts. Every Java program requires a class in order to work, so the Hello World! example wouldn't work without the class definition. A class is defined with the keywords public class nameOfTheClass.
public class HelloWorld {
    public static void main(String[] args) {
        System.out.println("Hello World!");
    }
}
In a program, classes are used to define concepts and functionalities related to those concepts. Objects can be created from a class and are the embodiments of that class. Every object that belongs to a certain class has the same structure, but the variables belonging to each objects can be different. The methods of objects handle the state of the object, that is, the variables of the object.
Let's inspect the class Book below; the class has the object variables name (String) and publishingYear (integer).
        public class Book {
            private String name;
            private int publishingYear;

            public Book(String name, int publishingYear) {
                this.name = name;
                this.publishingYear = publishingYear;
            }

            public String getName() {
                return this.name;
            }

            public int getPublishingYear() {
                return this.publishingYear;
            }
        }
The definition in the beginning, public class Book, tells the name of the class. This is followed by the definitions of object variables. Object variables are variables which for each of the objects created from the class are their own -- the object variables of one object are unrelated to the state of the same variables of another object. It's usually appropriate to hide the object variables from the users of the class, to define the visibility modifier private for them. If the visibility modifier is set to public, the user of the object will be able to directly access the object variables.
Objects are created from a class with a constructor. A constructor is a method that initializes an object (creates the variables belonging to the object) and executes the commands that are within the constructor. The constructor is always named the same as the class that has the constructor in it. In the constructor public Book(String name, int publishingYear) a new object is created from the class Book and its variables are set to the values that were passed in as parameters.
Two methods that handle the information in the object are also defined for the class above. The method public String getName() returns the name of the object in question. The method public int getPublishingYear() returns the publishing year of the object in question.
Object
Objects are created with the help of the constructor that is defined within a class. In the program code the costructor is called with the new command, which returns a reference to the new object. Objects are instances created from classes. Let's inspect a program that creates two different books, after which it prints the values returned by the getName methods belonging to the objects.
        Book senseAndSensibility = new Book("Sense and Sensibility", 1811);
        Book prideAndPrejudice = new Book("Pride and Prejudice", 1813);

        System.out.println(senseAndSensibility.getName());
        System.out.println(prideAndPrejudice.getName());
Sense and Sensibility
Pride and Prejudice
So, each object has its own internal state. The state is formed from object variables that belong to the object. Object variables can be both primitive type variables and reference type variables. If reference type variables belong to the objects, it is possible that other objects also refer to the same referenced objects! Let's visualize this with the bank example, in which there are accounts and persons.
        public class Account {
            private String accountID;
            private int balanceAsCents;

            public Account(String accountID) {
                this.accountID = accountID;
                this.balanceAsCents = 0;
            }

            public void deposit(int sum) {
                this.balanceAsCents += sum;
            }

            public int getBalanceAsCents() {
                return this.balanceAsCents;
            }

            // .. other methods related to an account
        }
        import java.util.ArrayList;

        public class Person {
            private String name;
            private ArrayList<Account> accounts;

            public Person(String name) {
                this.name = name;
                this.accounts = new ArrayList<Account>();
            }

            public void addAccount(Account account) {
                this.accounts.add(account);
            }

            public int moneyTotal() {
                int total = 0;
                for (Account account: this.accounts) {
                    total += account.getBalanceAsCents();
                }

                return total;
            }

            // ... other methods related to a person
        }
Each object created from the Person class has its own name and its own list of accounts. Next, let's create two persons and two accounts. One of the accounts is owned by only one person and the other one is shared.
        Person matti = new Person("Matti");
        Person maija = new Person("Maija");

        Account salaryAccount = new Account("NORD-LOL");
        Account householdAccount = new Account("SAM-LOL");

        matti.addAccount(salaryAccount);
        matti.addAccount(householdAccount);
        maija.addAccount(householdAccount);

        System.out.println("Money on Matti's accounts: " + matti.moneyTotal());
        System.out.println("Money on Maija's accounts: " + maija.moneyTotal());
        System.out.println();

        salaryAccount.deposit(150000);

        System.out.println("Money on Matti's accounts: " + matti.moneyTotal());
        System.out.println("Money on Maija's accounts: " + maija.moneyTotal());
        System.out.println();

        householdAccount.deposit(10000);

        System.out.println("Money on Matti's accounts: " + matti.moneyTotal());
        System.out.println("Money on Maija's accounts: " + maija.moneyTotal());
        System.out.println();
Money on Matti's accounts: 0
Money on Maija's accounts: 0

Money on Matti's accounts: 150000
Money on Maija's accounts: 0

Money on Matti's accounts: 160000
Money on Maija's accounts: 10000
Initially, the accounts of both persons are empty. When money is added to the salaryAccount - which matti has a reference to - the amount of money on Matti's accounts grows. When money is added to the householdAccount the amount of money each person has grows. This is because both Matti and Maija have "access" to the householdAccount, so in each of the persons' object variable accounts, there's a reference to the householdAccount.
The structure of a program
A program should be clear and easy to understand for both the original writer and others. The most important aspects of a clear program are class structure and good naming conventions. Each class should have a single, clearly defined responsibility. Methods are used to reduce repetition and to create a structure for the internal functionality of the class. A method should also have a clear responsibility to ensure it stays short and simple. Methods that do many things should be divided into smaller helper methods, which are called by the original method. A good programmer writes code that can be understood even weeks after it was originally written.
Good, understandable code uses descriptive naming of variables, methods and classes, and consistent indentation. Let's look at the example below, a small program for buying and selling goods. Even though the only thing available is carrots, with no bookkeeping, the user interface could be extended to use a storage class to keep track of items.
public class UserInterface {
    private Scanner reader;

    public UserInterface(Scanner reader) {
        this.reader = reader;
    }

    public void start() {
        while (true) {
            String command = reader.nextLine();

            if (command.equals("end")) {
                break;
            } else if (command.equals("buy")) {
                String line = null;
                while(true) {
                    System.out.print("What to buy: ");
                    line = reader.nextLine();
                    if(line.equals("carrot")) {
                        break;
                    } else {
                        System.out.println("Item not found!");
                    }
                }

                System.out.println("Bought!");
            } else if (command.equals("sell")) {
                String line = null;
                while(true) {
                    System.out.print("What to sell: ");
                    line = reader.nextLine();
                    if(line.equals("carrot")) {
                        break;
                    } else {
                        System.out.println("Item not found!");
                    }
                }

                System.out.println("Sold!");
            }
        }
    }
}
This example has numerous problems. The first problem is the long start method. It can be shortened by moving most of the command handling to a separate method.
public class UserInterface {
    private Scanner reader;

    public UserInterface(Scanner reader) {
        this.reader = reader;
    }

    public void start() {
        while (true) {
            String command = reader.nextLine();

            if (command.equals("end")) {
                break;
            } else {
                handleCommand(command);
            }
        }
    }

    public void handleCommand(String command) {
        if (command.equals("buy")) {
            String line = null;
            while(true) {
                System.out.print("What to buy: ");
                line = reader.nextLine();
                if(line.equals("carrot")) {
                    break;
                } else {
                    System.out.println("Item not found!");
                }
            }

            System.out.println("Bought!");
        } else if (command.equals("sell")) {
            String line = null;
            while(true) {
                System.out.print("What to sell: ");
                line = reader.nextLine();
                if(line.equals("carrot")) {
                    break;
                } else {
                    System.out.println("Item not found!");
                }
            }

            System.out.println("Sold!");
        }
    }
}
handleCommand still has some repetition for reading the user input. Both buying and selling first print a character string with the question, then take input from the user. If the input is incorrect (other than "carrot"), "Item not found!" is printed. We will create a new method, public String readInput(String question), to handle this. Note that if the program used some other object to keep track of inventory, we would compare user input to the inventory's contents instead.
public class UserInterface {
    private Scanner reader;

    public UserInterface(Scanner reader) {
        this.reader = reader;
    }

    public void start() {
        while (true) {
            String command = reader.nextLine();

            if (command.equals("end")) {
                break;
            } else {
                handleCommand(command);
            }
        }
    }

    public void handleCommand(String command) {
        if (command.equals("buy")) {
            String input = readInput("What to buy: ");
            System.out.println("Bought!");
        } else if (command.equals("sell")) {
            String input = readInput("What to sell: ");
            System.out.println("Sold!");
        }
    }

    public String readInput(String question) {
        while (true) {
            System.out.print(question);
            String line = reader.nextLine();

            if (line.equals("carrot")) {
                return line;
            } else {
                System.out.println("Item not found!");
            }
        }
    }
}
The program is now divided into appropriate parts. There are still a few things, other than implementing more methods, we can do to improve readability. The start method has an if branch that ends in break, which exits the loop. We can remove the unnecessary else branch, simply moving the handleCommand method to be called after the if statement. The program still works exactly as before, but the method is now shorter and easier to read. A similar situation exists in the readInput method, so we will clean it up too.
public class UserInterface {
    private Scanner reader;

    public UserInterface(Scanner reader) {
        this.reader = reader;
    }

    public void start() {
        while (true) {
            String command = reader.nextLine();

            if (command.equals("end")) {
                break;
            }

            handleCommand(command);
        }
    }

    public void handleCommand(String command) {
        if (command.equals("buy")) {
            String input = readInput("What to buy: ");
            System.out.println("Bought!");
        } else if (command.equals("sell")) {
            String input = readInput("What to sell: ");
            System.out.println("Sold!");
        }
    }

    public String readInput(String question) {
        while (true) {
            System.out.print(question);
            String line = reader.nextLine();

            if (line.equals("carrot")) {
                return line;
            }

            System.out.println("Item not found!");
        }
    }
}
Dividing a program into smaller parts, like we did above, is called refactoring. It does not change how the program works, but the internal structure is changed to be more clear and easier to maintain. The current version is clearer than the original, but it can be improved further. For example, handleCommand can be further divided into two different methods, one for handling buying and the other for selling.
public class UserInterface {
    private Scanner reader;

    public UserInterface(Scanner reader) {
        this.reader = reader;
    }

    public void start() {
        while (true) {
            String command = reader.nextLine();

            if (command.equals("end")) {
                break;
            }

            handleCommand(command);
        }
    }

    public void handleCommand(String command) {
        if (command.equals("buy")) {
            commandBuy();
        } else if (command.equals("sell")) {
            commandSell();
        }
    }

    public void commandBuy() {
        String input = readInput("What to buy: ");
        System.out.println("Bought!");
    }

    public void commandSell() {
        String input = readInput("What to sell: ");
        System.out.println("Sold!");
    }

    public String readInput(String question) {
        while (true) {
            System.out.print(question);
            String line = reader.nextLine();

            if (line.equals("carrot")) {
                return line;
            } else {
                System.out.println("Item not found!");
            }
        }
    }
}
The program now has a clear structure with descriptively named methods. Every method is short and has a small task to handle. Note that refactoring the code did not add any new functionality, it merely changed the way the program works internally.
Programming and the importance of practicing
As far as we know, nobody has yet learned programming by listening to lectures. To develop the skill required in programming, it is essential to practice both what you have learned earlier and things that are new to you. Programming can be compared to speaking languages or playing an instrument, both of which can only be learned by doing. Master violinists are probably not good at playing only because they practice a lot. Playing an instrument is fun, which makes one more motivated to practice. The same applies to programming.
As Linus Torvalds said, "Most good programmers do programming not because they expect to get paid or get adulation by the public, but because it is fun to program".
Dr. Luukkainen has written a list of instructions for new programmers to follow when learning to program. Follow this advice to become a great programmer!
- Take small steps
- Divide the problem you are trying to solve into smaller parts and solve them one at a time
- Keep testing that your solution is moving in the right direction, ensuring that you have solved the current part correctly
- Keep the code as clean as you can
- use proper indentation
- use descriptive names for variables, methods, classes, everything
- keep all methods short, including
main - write methods that only do one thing
- remove all copy-paste code by refactoring (or don't copy and paste code in the first place!)
- replace "bad" and unclear code with clean, easy to read code
Visibility
Until now, we have been using two different keywords to define the visibility of methods and instance variables. public makes the method or instance variable visible and accessable to everyone. Methods and constructors are usually marked as public, so that they can be called from outside the class.
Declaring a method or instance variable private hides it from the outside, making it only accessible from inside the same class.
public class Book {
    private String name;
    private String contents;

    public Book(String name, String contents) {
        this.name = name;
        this.contents = contents;
    }

    public String getName() {
        return this.name;
    }

    public String getContents() {
        return this.contents;
    }

    // ...
}
The instance variables in the Book class above can only be accessed with the public methods getName and getContents. Fields declared as private are only accessible in code inside the class. Methods can also be declared as private, which prevents them from being called outside the class.
Now it's time to start practicing!
Smileys
Create the support method private static void printWithSmileys(String characterString) for the class Smileys which comes with the assignment template. The method is to print the given character string surrounded with smileys. Use the character string :) as the smiley.
printWithSmileys("\\:D/");
:):):):):)
:) \:D/ :)
:):):):):)
Note, that the character string must have \\ so we can print the symbol \.
Note! if the length of the character string is an odd number, add an extra space on the right side of the given character string.
printWithSmileys("\\:D/");
printWithSmileys("87.");
:):):):):)
:) \:D/ :)
:):):):):)
:):):):):)
:) 87.  :)
:):):):):)
It's a good idea to first think how many smileys should be printed for a character string of a certain length. The length of a character string can be found out with the method length which belongs to it. A loop is helpful for printing the top and bottom smiley rows, the middle row can be handled with a normal print command. You can check if a length is an odd number with the help of a remainder characterString.length() % 2 == 1.
Character String Changer
In this assignment we create a character string changer, which consists of two classes. The class Changer turns a single character to another one. The Changer holds a number of Changes and changes character strings with the help of Change objects it holds.
Change-class
Create a class Change, that has the following functionalities:
- constructor
public Change(char fromCharacter, char toCharacter)that creates an object that makes changes from characterfromCharactertotoCharacter - method
public String change(String characterString)returns the changed version of the given character string
The class is used in the following way:
  String word = "carrot";
  Change change1 = new Change('a', 'b');
  word = change1.change(word);

  System.out.println(word);

  Change Change2 = new Change('r', 'x');
  word = Change2.change(word);

  System.out.println(word);
The example above would print:
  cbrrot
  cbxxot
Tip: you can handle replacing characters in two ways, either with the help of a method in the class String (look for it yourself!) or by going through the character string character by character while forming the changed character string.
If you don't use the ready-made method of String, it is good to remember that even though you compare character strings with the command equals you compare single characters with the == operator:
  String word = "carrot";

  String replacedA = "";
  for ( int i=0; i < word.length(); i++) {
     char character = word.charAt(i);
     if ( character == 'a' ) {
        replacedA += '*'
     }  else {
        replacedA += character;
     }
  }

  System.out.println(replacedA);  // prints c*rrot
Changer-class
Create the class Changer, with the following functions:
- constructor
public Changer()creates a new changer - method
public void addChange(Change change)adds a new Change to the Changer - method
public String change(String characterString)executes all added Changes for the character string in the order of their adding and returns the changed character string
The class is used in the following way:
  Changer scandiesAway = new Changer();
  scandiesAway.addChange(new Change('ä', 'a'));
  scandiesAway.addChange(new Change('ö', 'o'));
  System.out.println(scandiesAway.change("ääliö älä lyö, ööliä läikkyy"));
The above example would print:
aalio ala lyo, oolia laikkyy
Tip: It's a good idea to store the Changes to a list object variable of Changer (in the same fashion as on the basics course we stored players to a team, phone numbers to a phone book or books to a library, for example) A Changer is executed so that the changes are done to the character string one at a time as in the following example:
    ArrayList<Change> changes = new ArrayList<Change>();

    changes.add( new Change('a', 'b') );
    changes.add( new Change('k', 'x') );
    changes.add( new Change('o', 'å') );

    String word = "carrot";

    for (Change Change : changes) {
        word = Change.change(word);
    }

    System.out.println(word);  // print pårxxbnb
REMINDER when you add an ArrayList, a Scanner or a Random, Java doesn't recognize the class unless you "import" it by adding the following lines to the beginning:
import java.util.ArrayList;    // imports ArrayList
import java.util.*;            // imports all tools from java.util, including ArrayList, Scanner ja Random
Calculator
In this assignment, we make a simple calculator, similar to the one made in the material of programming basics' week 1. This time however, we pay attention to the structure of the program. Especially we will make the main-method (the main program) very light. The main program method doesn't actually do anything else than just start the program:
public class Main {
    public static void main(String[] args) {
        Calculator calculator = new Calculator();
        calculator.start();
    }
}
What the main program here does is it just creates the object that implements the actual application logic and then starts it. This is the proper way of creating programs and from now on we'll try to achieve this structure.
Reader
In order to communicate with the user, the calculator needs a Scanner-object. As we've seen, reading integers with a Scanner is a little laborious. We now create a separate class Reader that encapsulates a Scanner-object.
Implement the class Reader and add the following methods to it
public String readString()public int readInteger()
Within the Reader there should be a Scanner-object as an instance variable, which the methods use in the old familiar way we know from programming basics. Remember that when reading integers, it's good to first read the entire line and then turn that in to an integer. Here we can utilize the method parseInt of the Integer-class.
Application body
The calculator works like this:
command: sum
value1: 4
value2: 6
sum of the values 10

command: product
value1: 3
value2: 2
product of the values 6

command: end
Implement the class Calculator to take care of the application logic of your program, and for that class a method public void start() which looks exactly like this:
    public void start() {
        while (true) {
            System.out.print("command: ");
            String command = reader.readString();
            if (command.equals("end")) {
                break;
            }

            if (command.equals("sum")) {
                sum();
            } else if (command.equals("difference")) {
                difference();
            } else if (command.equals("product")) {
                product();
            }
        }

        statistics();
    }
The calculator has the operations sum, difference, product.
Finish the bodies for the methods sum, difference, product and stasistics. All of them are to be of the type private void which means that the methods are available only for internal use in the calculator.
Add an instance variable of the type Reader for the calculator and create the reader in the constructor. The calculator may not have a separate Scanner-type variable!
Implementation of the application logic
Now implement the methods sum, difference and product so that they work according to the example above. In the example, first a command is asked from the user and then two values. The desired operation is then executed and the value of the operation is printed. Notice that asking the user for the values happens within the methods sum, difference and product! The methods use the Reader-object to ask the values, so the body of the methods is as follows:
    private void sum() {
       System.out.print("value1: ");
       int value1 = // read the value using the Reader-object
       System.out.print("value2: ");
       int value2 = // read the value using the Reader-object
       // print the value according to the example above
    }
Statistics
After the while-loop in the start-method, the method statistics is called. The method is meant to print the amount of operations done with the Calculator-object:
command: sum
value1: 4
value2: 6
sum of the values 10

command: product
luku1: 3
luku2: 2
product of the values 6

command: end
Calculations done 2
Implement the method private void statistics(), and make the required changes to the code of the Calculator-class in order to collect the statistics.
Note: if an invalid command is given to the program (something other than sum, difference, product or end), the calculator will not react to the command in any way, but instead continues by asking the next command. Statistics is not to count an invalid command as a completed calculation.
command: integral
command: difference
value1: 3
value2: 2
difference of the values 1

command: end
Calculations done 1
Bonus assignment (not tested): Reading the user input is repeated in the same way in all three operation implementing methods. Remove the repetition from your code with the help of a support method. The method can return the two values asked from the user in an array, for example.
Primitive- and reference-type variables
Java is a strongly typed language, what this means is that all of its variables have a type. The types of the variables can be divided in to two categories: primitive-type and reference-type variables. Both types of variables have their own "slot", which holds the information belonging to them. Primitive-type variables hold the concrete value in their slot, while the reference-type variables hold a reference to a concrete object.
Primitive-type variables
The value of a primitive type variable is saved in a slot created for the variable. Each primitive-type variable has its own slot and its own value. A variable's slot is created when it is introduced (int number;, for example). A value is set to a slot with the assignment operator =. Below is an example of the introduction of a primitive-type int (integer) variable and setting of its value in the same expression.
int number = 42;
Primtive type variables, among others, are int, double, char, boolean and the more rarely used short, float, byte and long. Another primitive-type is void, but it doesn't have its own slot or value. The void-type is used when we want to express that a method doesn't return a value.
Next we introduce two primitive-type variables and set values to them.
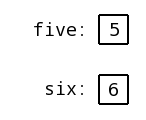
int five = 5;
int six = 6;
The primitive-type variables introduced above are named five and six. When introducing the variable five the value 5 is set to the slot that was created for it (int five = 5;). When introducing the variable six the value 6 is set to the slot that was created for it (int six = 6;). The variables five and six are both of the type int, or integers.
Primitive-type variables can be visualized as boxes that both have the values belonging to them saved in to them:
Next lets inspect how the values of primitive-type variables get copied.
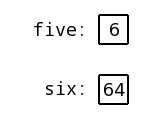
int five = 5;
int six = 6;

five = six; // the variable 'five' now holds the value 6 - the value that was in the variable 'six'.
six = 64; // the variable 'six' now holds the value 64

// the variable 'five' still holds the value 6
Above we introduce the variables five and six and we set values to them. After this the value held in the slot of the variable six is copied to the slot of the variable five (five = six;). If the value of the variable six is changed after this point the value in the variable five remains unaffected: the value of the variable five is in its own slot and is not related to the value in the slot of the variable six in any way. The end situation as a picture:
Primitive type variable as a method parameter and return value
When a primitive type variable is passed to a method as a parameter, the method parameter is set to the value in the given variable's slot. In practice, the method parameters also have their own slots to which the value is copied, like in an assignment expression. Let us consider the following method addToValue(int value, int amount).
public int addToValue(int value, int amount) {
    return value + amount;
}
The method addToValue is given two parameters: value and amount. The method returns a new value, which is the sum of the given parameters. Let us investigate how the method is called.
int myValue = 10;
myValue = addToValue(myValue, 15);
// the variable 'myValue' now holds the value 25
In the example, addToValue is called using the variable myValue and the value 15. These are copied to the method parameters value, which will hold the value 10 (the contents of myValue), and amount, which wil hold the value 15. The method returns the sum of value and amount, which is equal to 10 + 15 = 25.
Note! In the previous example, the value of the variable myValue is changed only because it is assigned the return value of addToValue (myValue = addToValue(myValue, 15);). If the call to addToValue were as follows, the value of the variable myValue would remain unchanged.
int myValue = 10;
addToValue(myValue, 15);
// the variable 'myValue' still holds the value 10
Minimum and maximum values
Each primitive data type can represent a specific range of values limited by its minimum and maximum value, which are the smallest and largest values representable by the type. This is because a predefined data size is used for the internal represetantion of the type in Java (and most other programming languages).
The minimum and maximum values for a few Java primitive types are:
| Data type | Description | Minimum value | Max value |
|---|---|---|---|
| int | Integer | -2 147 483 648 (Integer.MIN_VALUE) | 2 147 483 647 (Integer.MAX_VALUE) |
| long | Long interger | -9 223 372 036 854 775 808 (Long.MIN_VALUE) | 9 223 372 036 854 775 807 (Long.MAX_VALUE) |
| boolean | Truth value | true or false | |
| double | Floating point | Double.MIN_VALUE | Double.MAX_VALUE |
Rounding errors
When using floating point data types, it is important to keep in mind that floating point types are always an approximation of the actual value. Because floating point types use a predefined data size to represent the value similarly to all other primitive data types, we may observe quite surprising rounding errors. For example, consider the following case.
double a = 0.39;
double b = 0.35;
System.out.println(a - b);
The example prints the value 0.040000000000000036. Programming languages usually include tools to more accurately handle floating point numbers. In Java, for example, the class BigDecimal can be used to store infinitely long floating point numbers.
When comparing floating point numbers, rounding errors are usually taken into account by comparing the distance between the values. For example, with the variables in the previous example, the expression a - b == 0.04 does not produce the expected result due to a rounding error.
double a = 0.39;
double b = 0.35;

if((a - b) == 0.04) {
    System.out.println("Successful comparison!");
} else {
    System.out.println("Failed comparison!");
}
Failed comparison!
One method to calculate the distance between two values is as follows. The helper function Math.abs returns the absolute value of the value passed to it.
double a = 0.39;
double b = 0.35;

double distance = 0.04 - (a - b);

if(Math.abs(distance) < 0.0001) {
    System.out.println("Successful comparison!");
} else {
    System.out.println("Failed comparison!");
}
Successful comparison!
Reference-Type Variables
Reference-type variables memorize the information which has been assigned to them "on the other end of the line". Reference-type variables contain a reference to the location where the information is stored. Differently from primitive-type variables, reference-type variable do not have a limited scope because their value or information is stored at the referenced location. Another substantial difference between primitive-type and reference-type variables is that various different reference-type variables can point to the same object.
Let us have a look at two reference-type variables. In the following examples we make use of the class Calculator:
public class Calculator {
    private int value;

    public Calculator(int originalValue) { // Contructor
        this.value = originalValue;
    }

    public void increaseValue() {
        this.value = this.value + 1;
    }

    public int getValue() {
        return value;
   }
}
Main:
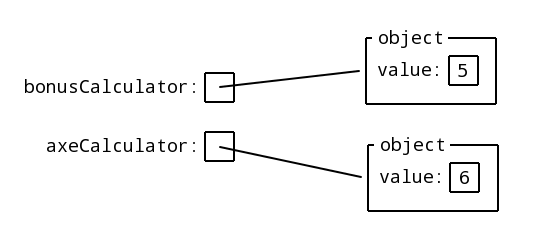
Calculator bonusCalculator = new Calculator(5);
Calculator axeCalculator = new Calculator(6);
In the examples we first create a reference-type variable called bonusCalculator. The new operator tells that we define storage space for the information to be assigned to the variable, then we execute the code which follows the new operator, and we return a reference to the object that has been so created. The reference which is returned is assigned to the bonusCalculator variable through the = equal sign. The same thing happens with the variable called axeCalculator. If we want to think about it with pictures, we can imagine a reference-type variable as it were a box, the variable itself, with a line or an arrow, which starts at the box and points to an object. In fact, the variable does not contain the object, but it points to the object information.
Next, let us have a look at how a reference-type object is duplicated.
Calculator bonusCalculator = new Calculator(5);
Calculator axeCalculator = new Calculator(6);

bonusCalculator = axeCalculator; // the reference contained by the variable axeCalculator is copied to the variable bonusCalculator
                                 // that is to say, a reference to a Calculator-type object which received the value 6 in its constructor
                                 // is copied to the variable bonusCalculator
When we copy a reference-type variable (see above bonusCalculator = axeCalculator;), the reference to the variable duplicates as well. In this case, a reference to the axeCalculator variable slot is copied to the bonusCalculator variable slot. Now, both the objects point to the same place!

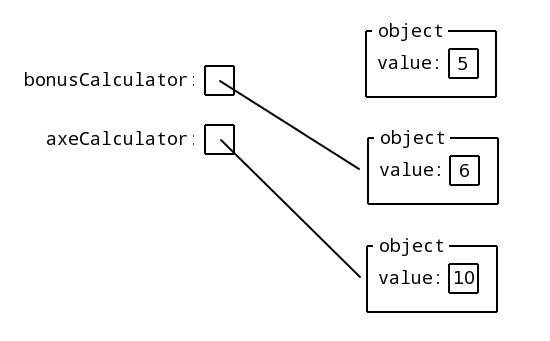
Let us continue with the example above and let us set a new reference to the variable axeCalculator; this new reference will point to a new object created by the command new Calculator(10).
Calculator bonusCalculator = new Calculator(5);
Calculator axeCalculator = new Calculator(6);

bonusCalculator = axeCalculator; // the reference contained by the variable axeCalculator is copied to the variable bonusCalculator
                                 // that is to say, a reference to a Calculator-type object which received the value 6 in its constructor
                                 // is copied to the variable

axeCalculator = new Calculator(10); // a new reference is assigned to the axeCalculator variable
                                    // which points to the object created by the command new Calculator(10)

// the bonusCalculator variable still contains a reference to the Calculator object which received value 6 in its parameter
In these examples, we do the same operations which were shown in the assignment example in the primitive-type variables section. In the very last example, we copied the reference of reference-type variables, whereas in the primitive-type variables section we copied the value of primitive-type variables. In both cases, we copy the contents of a slot: the primitive-type variable slot contains a value, whereas the reference-type variable slot contains a reference.
At the end of the previous example no variable points to the Calculator object which received value 5 in its constructor. Java's garbage collection deletes such useless objects from time to time. Our final situation looks like the following:
Let us have a look to a third example still, and let us focus on an essential difference between primitive-type and reference-type variables.
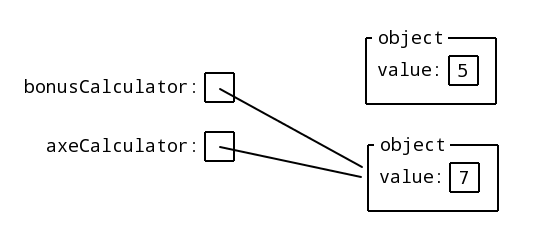
Calculator bonusCalculator = new Calculator(5);
Calculator axeCalculator = new Calculator(6);

bonusCalculator = axeCalculator; // the reference contained by the variable axeCalculator is copied to the variable bonusCalculator
                                 // that is to say, a reference to a Calculator-type object which received the value 6 in its constructor
                                 // is copied to the variable

axeCalculator.increaseValue(); // we increase by one the value of the object referenced by axeCalculator

System.out.println(bonusCalculator.getValue());
System.out.println(axeCalculator.getValue());
7
7
Both bonusCalculatorand axeCalculator point to the same object, after we have run the command bonusCalculator = axeCalculator;, and therefore, now they both have the same value 7, even though we have increased only one of them.
The situation might be clear if we look at the following picture. The method axeCalculator.increaseValue() increases by one the value variable of the object pointing to the axeCalculator variable. Because bonusCalculator points to the same object, the method bonusCalculator.getValue() returns the same value which was increased by the method axeCalculator.increaseValue().
In the following example, three reference-type variables all point to the same Calculator object.
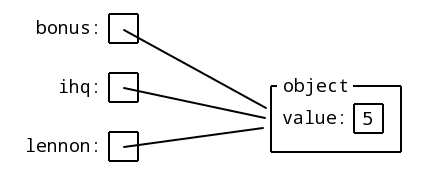
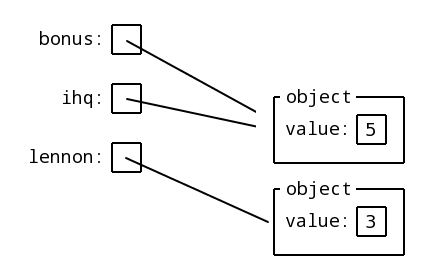
Calculator bonus = new Calculator(5);
Calculator ihq = bonus;
Calculator lennon = bonus;
In the example, we create only one Calculator object, but all the three Calculator variables point to that same one. Therefore, bonus, ihq, and lennon method calls all modify the same object. To tell it once again: when reference-type variables are copied, their references also duplicate. The same concept in a picture:
Let's use this example to focus on duplication once more.
Calculator bonus = new Calculator(5);
Calculator ihq = bonus;
Calculator lennon = bonus;

lennon = new Calculator(3);
The modification of the lennon variable contents – that is to say the change of reference – does not affect the references of either bonus or ihq. When we assign a value to a variable, we only change the contents of that variable's own slot. The same concept in a picture:
A Reference-Type Variables and Method Parameters
When a reference-type variable is given to a method as its parameter, we create a method parameter which is the copy of the reference of a variable. In other words, we copy the reference to the parameter's own slot. Differently from what happens with original-type variables, we copy the reference and not their value. In fact, we can modify the object behind the reference even from within the method. Let us take the method public void addToCalculator(Calculator calculator, int amount).
public void addToCalculator(Calculator calculator, int amount) {
    for (int i = 0; i < amount; i++) {
        calculator.increaseValue();
    }
}
We give two parameters to the method addToCalculator – a reference-type value and an original-type variable. The contents of both variable slots are copied to method parameter slots. The reference-type parameter calculator receives a copy of a reference, whereas the original-type parameter amount receives the copy of value. The method will call the increaseValue() method of the Calculator-type parameter, and it will do it as many times as the value of the amount variable. Let us analyze the method call a little more deeply.
int times = 10;

Calculator bonus = new Calculator(10);
addToCalculator(bonus, times);
// the bonus variable value is now 20
In the example we call the addToCalculator method, whose given variables are bonus and times. This means that the reference of the reference-type variable bonus and the value of the original-type variable times (which is 10) are copied as parameters whose names are calculator and amount, respectively. The method executes the increaseValue() method of the calculator variable a number of times which equals the value of amount. See the following picture:
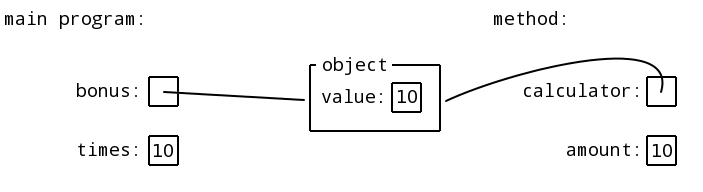
The method contains variables which are completely separated from the main program!
As far as the reference-type variable is concerned, a reference duplicates and it is given to the method, and the variable inside the method will still point to the same object. As far as the original-type variable is concerned, a value is copied, and the variable inside the method will have its completely independent value.
The method recognises the calculator which the bonus variable points to, and the alterations made by the method have a direct impact on the object. The situation is different with original-type variables, and the method only receives a copy of the value of the times variable. In fact, it is not possible to modify the value of original-type variables directly within a method.
A method which returns a reference-type variable
When a method returns a reference-type variable, it returns the reference to an object located elsewhere. Once the reference is returned by a method, it can be assigned to a variable in the same way as a normal assignment would happen, through the equal sign (=). Let us have a look at the method public Calculator createCalculator(int startValue), which creates a new reference-type variable.
public Calculator createCalculator(int startValue) {
    return new Calculator(startValue);
}
The creteCalculator method creates an object and returns its newCalculator reference. By calling the method, we always create a new object. In the following example we create two different Calculator-type objects.
Calculator bonus  = createCalculator(10);
Calculator lennon = createCalculator(10);
The method createCalculator always creates a new Calculator-type object. With the first call, Calculator bonus = createCalculator(10); we assign the method return reference to the bonus variable. With the second call, we create another reference and we assign it to the lennon variable. The variables bonus and lennon do not contain the same reference because the method creates a new object in both cases, and it returns the reference to that particular object.
Static and Non-Static
Let's further investigate a topic we introduced in the 30th section of Introduction to Programming. The static or non-static nature of a variable or of a method depends on their scope. Static methods are always related to their class, whereas non-static methods can modify the variables of the object itself.
Static, Class Libraries and Final
The methods which receive the definition static are not related to objects but to classes. it is possible to define class-specific variables by adding the word static to their name. For instance, Integer.MAX_VALUE, Long.MIN_VALUE and Double.MAX_VALUE are all static methods. Static methods are called via their class name, for instance ClassName.variable or ClassName.method().
We call class library a class which contains common-use methods and variables. For instance, Java Math class is a class library. It provides the Math.PI variable, inter alia. Often, creating your own class libraries can prove useful. Helsinki Regional Transport Authority (Finnish: Helsingin Seudun Liikenne, HSL) could use a class library to keep its ticket prices at its fingertips.
public class HslPrices {
    public static final double SINGLETICKET_ADULT = 2.50;
    public static final double TRAMTICKET_ADULT = 2.50;
}
The keyword final in the variable definition tells that once we assign a value to a variable, we can not assign a new one to it. Final-type variables are constant, and they always have to have a value. For instance, the class variable which tells the greatest integer, Integer.MAX_VALUE, is a constant class variable.
Once we have the class presented above, HslPrices, all the programs which need the single or tram-ticket price can have access to it through the class HslPrices. With the next example, we present the class Person, which has the method enoughMoneyForSingleTicket(), which makes use of the ticket price found in the class HslPrices.
public class Person {
    private String name;
    private double money;
    // more object variables

    // constructor

    public boolean enoughMoneyForSingleTicket() {
        if(this.money >= HslPrices.SINGLETICKET_ADULT) {
            return true;
        }

        return false;
    }

    // the other methods regarding the class Person
}
The method public boolean enoughMoneyForSingleTicket() compares the object variable money of class Person to the static variable SINGLETICKET_ADULT of class HslPrices. The method enoughMoneyForSingleTicket() can be called only through an object reference. For instance:
Person matti = new Person();

if (matti.enoughMoneyForSingleTicket()) {
    System.out.println("I'll buy a ticket.");
} else {
    System.out.println("Fare dodging, yeah!");
}
Note the naming convention! All constants, i.e. all variable which are provided with the definition final, are written with CAPITAL_LETTERS_AND_UNDERLINE_CHARACTERS.
Static methods function analogously. For instance, the class HslPrices could encapsulate the variables and only provide accessors. We call accessors the methods which allow us to either read a variable value or to assign them a new one.
public class HslPrices {
    public static final double SINGLETICKET_ADULT = 2.50;
    public static final double TRAMTICKET_ADULT = 2.50;

  public static double getSingleTicketPrice() {   // Accessor
    return SINGLETICKET_ADULT;
  }

  public static double getTramTicketPrice() {   // Accessor
    return TRAMTICKET_ADULT;
  }
}
In such cases, when we code a class such as Person, we can't call the variable straight, but we have to get it through the method getSingleTicketPrice().
public class Peson {
    private String name;
    private double money;
    // other object variables

    // constructor

    public boolean enoughMoneyForSingleTicket() {
        if(this.money >= HslPrices.giveSingleTicketPrice()) {
            return true;
        }

        return false;
    }

    // other methods regarding the class Person
}
Even though Java allows for static variable use, we do not usually require it. Often, using static methods causes problems with the program structure, because static variables are as inconvenient as global variables. The only static variables we use in this course are constant, i.e. final!
Non-Static
Non-static methods and variables are related to objects. The object variables, or attributes, are defined at the beginning of the class. When an object is created with the new operator, we allocate storage space for all its object variables. The variable values are personal of the object, which means that every object receives personal variable values. Let us focus again on the class Person, which has the object variable name and money.
public class Person {
  private String name;
  private double money;

  // other details
}
When we create a new instance of class Person, we also initialize its variables. If we do not initialize the reference-type variable name, it receives value null. Let us add the constructor and a couple of methods to our class Person.
public class Person {
  private String name;
  private double money;

    // constructor
    public Person(String name, double money) {
        this.name = name;
        this.money = money;
    }

    public String getName() {
        return this.name;
    }

    public double getMoney() {
        return this.money;
    }

    public void addMoney(double amount) {
        if(amount > 0) {
          this.money += amount;
        }
    }

    public boolean enoughMoneyForSigleTicket() {
        if(this.money >= HslPrices.getSingleTicketPrice()) {
            return true;
        }

        return false;
    }
}
The constructor Person(String name, double money) creates a new Person object, and it returns its reference. The method getName() returns the reference to a name object, and the getMoney() method returns the original-type variable money. The method addMoney(double amount) receives as parameter an amount of money, and it adds it to the money object variable if the parameter's value is greater than 0.
Object methods are called through their object reference. The following code example creates a new Person object, increases its money, and prints its name, at the end. Note that the method calls follow the pattern objectName.methodName()
Person matti = new Person("Matti", 5.0);
matti.addMoney(5);

if (matti.enoughMoneyForSingleTicket()) {
    System.out.println("I'll buy a single ticket.");
} else {
    System.out.println("Fare dodging, yeah!");
}
The example prints "I'll buy a single ticket."
Class Methods
Non-static class methods can be also called without specifying the object which indicates the class. In the following example, the toString() method points to the class Person, which calls the object method getName().
public class Person {
    // earlier written content

    public String toString() {
        return this.getName();
    }
}
The toString() method calls the class method getName(), which belongs to the object in question. The this prefix emphasizes that the call refers precisely to this object.
Non-static methods can also call static methods, that is the class-specific ones. On the other hand, static methods can not call non-static methods without a reference to the object itself, which is essential to retrieve the object information.
A Variable within a Method
The variables which are defined inside a method are auxiliary variables used during the method execution, and they are not to be confused with object variables. The example below shows how a local variable is created inside a method. The index variable exists and is accessible only during the method execution.
public class ... {
    ...

    public static void printTable(String[] table) {
        int index = 0;

        while(index < table.length) {
            System.out.println(table[index]);
            index++;
        }
    }
}
In the printTable() method, we create the auxiliary variable index which we use to parse the table. The variable index exists only during the method execution.
Thing, Suitcase, and Container
In these exercises, we create the classes Thing, Suitcase, and Container, and we train to use objects which contain other objects.
Class Thing
Create the class Thing whose objects can represent different kinds of things. The information to store are the thing's name and weight (kg).
Add the following methods to your class:
- A construsctor, which is given the thing's name and weight as parameter
public String getName(), which returns the thing's namepublic int getWeight(), which returns the thing's weightpublic String toString(), which returns a string in the form "name (weight kg)"
Below, you find an example of how to use the class:
public class Main {
    public static void main(String[] args) {
        Thing book = new Thing("Happiness in Three Steps", 2);
        Thing mobile = new Thing("Nokia 3210", 1);

        System.out.println("Book name: " + book.getName());
        System.out.println("Book weight: " + book.getWeight());

        System.out.println("Book: " + book);
        System.out.println("Mobile: " + mobile);
    }
}
The program output should look like the following:
Book name: Happiness in Three Steps
Book weight: 2
Book: Happiness in Three Steps (2 kg)
Mobile: Nokia 3210 (1 kg)
Class Suitcase
Create the class Suitcase. Suitcase has things and a maximum weight limit, which defines the greatest total allowed weight of the things contained within the Suitcase object.
Add the following methods to your class:
- A constructor, which is given a maximum weight limit
public void addThing(Thing thing), which adds thethingin the parameter to your suitcase. The method does not return any value.public String toString(), which returns a string in the form "x things (y kg)"
The things are saved into an ArrayList object:
ArrayList<Thing> things = new ArrayList<Thing>();
The class Suitcase has to make sure the thing's weight does not cause the total weight to exceed the maximum weight limit. The method addThing should not add a new thing if the total weight happens to exceed the maximum weight limit.
Below, you find an example of how the class can be used:
public class Main {
    public static void main(String[] args) {
        Thing book = new Thing("Happiness in three steps", 2);
        Thing mobile = new Thing("Nokia 3210", 1);
        Thing brick = new Thing("Brick", 4);

        Suitcase suitcase = new Suitcase(5);
        System.out.println(suitcase);

        suitcase.addThing(book);
        System.out.println(suitcase);

        suitcase.addThing(mobile);
        System.out.println(suitcase);

        suitcase.addThing(brick);
        System.out.println(suitcase);
    }
}
The program output should look like the following:
0 things (0 kg)
1 things (2 kg)
2 things (3 kg)
2 things (3 kg)
Language Check
"0 things" or "1 things" is not really proper English – it would be better to say "empty" or "1 thing". Implement this change in the class Suitcase.
Now, the output of the previous program should look like the following:
empty (0 kg)
1 thing (2 kg)
2 things (3 kg)
2 things (3 kg)
Every Thing
Add the following methods to Suitcase:
-
printThings, which prints out all thethingsinside the suitcase -
totalWeight, which returns the total weight of thethingsin your suitcase
Below, there is an example of how the class can be used:
public class Main {
    public static void main(String[] args) {
        Thing book = new Thing("Happiness in Three Steps", 2);
        Thing mobile = new Thing("Nokia 3210", 1);
        Thing brick = new Thing("Brick", 4);

        Suitcase suitcase = new Suitcase(10);
        suitcase.addThing(book);
        suitcase.addThing(mobile);
        suitcase.addThing(brick);

        System.out.println("Your suitcase contains the following things:");
        suitcase.printThings();
        System.out.println("Total weight: " + suitcase.totalWeight() + " kg");
    }
}
The program output should now look like the following:
Your suitcase contains the following things:
Happiness in Three Steps (2 kg)
Nokia 3210 (1 kg)
Brick (4 kg)
Total weight: 7 kg
Modify your class also so that you use only two object variables. One contains the maximum weight, the other is a list with the things in your suitcase.
The heaviest Thing
Now, add the method heaviestThing to your class Suitcase, which returns the thing which weighs the most. If there are more than one thing with the same weight, the method can return either one. The method has to return an object reference. If the suitcase is empty, the method returns null.
Here is an usage example of the class:
public class Main {
    public static void main(String[] args) {
        Thing book = new Thing("Happiness in Three Steps", 2);
        Thing mobile = new Thing("Nokia 3210", 1);
        Thing brick = new Thing("Brick", 4);

        Suitcase suitcase = new Suitcase(10);
        suitcase.addThing(book);
        suitcase.addThing(mobile);
        suitcase.addThing(brick);

        Thing heaviest = suitcase.heaviestThing();
        System.out.println("The heaviest thing: " + heaviest);
    }
}
The program output should look like the following:
The heaviest thing: Brick (4 kg)
Container
Create the class Container, which has the following methods:
- a constructor which is given the maximum weight limit
-
public void addSuitcase(Suitcase suitcase), which adds the suitcase as a parameter to the container -
public String toString()which returns a string in the form "x suitcases (y kg)"
Store the suitcase with a suitable ArrayList construction.
The class Container has to make sure the thing's total weight does not overcome the maximum weight limitation. The method addSuitcase should not add a new suitcase if the total weight happens to exceed the maximum weight limit.
Below, there is an example of how the class can be used:
public class Main {
    public static void main(String[] args) {
        Thing book = new Thing("Happiness in Three Steps", 2);
        Thing mobile = new Thing("Nokia 3210", 1);
        Thing brick = new Thing("Brick", 4);

        Suitcase tomsCase = new Suitcase(10);
        tomsCase.addThing(book);
        tomsCase.addThing(mobile);

        Suitcase georgesCase = new Suitcase(10);
        georgesCase.addThing(brick);

        Container container = new Container(1000);
        container.addSuitcase(tomsCase);
        container.addSuitcase(georgesCase);

        System.out.println(container);
    }
}
The program output should look like the following:
2 suitcases (7 kg)
The Container Contents
Add the method public void printThings() to your Container; the method prints out all the things inside the container's suitcases.
Below is an example of how the class can be used:
public class Main {
    public static void main(String[] args) {
        Thing book = new Thing("Happiness in Three Steps", 2);
        Thing mobile = new Thing("Nokia 3210", 1);
        Thing brick = new Thing("Brick", 4);

        Suitcase tomsCase = new Suitcase(10);
        tomsCase.addThing(book);
        tomsCase.addThing(mobile);

        Suitcase georgesCase = new Suitcase(10);
        georgesCase.addThing(brick);

        Container container = new Container(1000);
        container.addSuitcase(tomsCase);
        container.addSuitcase(georgesCase);

        System.out.println("There are the following things in the container suitcases:");
        container.printThings();
    }
}
The program output should look like the following:
There are the following things in the container suitcases:
Happiness in Three Steps (2 kg)
Nokia 3210 (1 kg)
Brick (4 kg)
A Lot of Bricks
Let's check that our container works fine and we can still not exceed the maximum weight limit. In the Main class, create the method public static void addSuitcasesFullOfBricks(Container container), which adds 100 suitcases into the container it receives as parameter; there is one brick in each suitcase. The bricks weight will then increase by one each time until the weight becomes 100 kg.
The program body is the following:
public class Main {
    public static void main(String[] Container) {
        Container container = new Container(1000);
        addSuitcasesFullOfBricks(container);
        System.out.println(container);
    }

    public static void addSuitcasesFullOfBricks(Container container) {
        // adding 100 suitcases with one brick in each
    }
}
The program output should look like the following:
44 suitcases (990 kg)
HashMap
HashMap is one of Java's most useful data structures. The idea behind HashMap is we define an index for an object key - a unique value, for instance a social security number, a student number, or a phone number. We call hashing the process of changing a key into an index, or simply to define an index. The hashing happens thanks to a particular function which makes sure that we get always the same index with a known key.
Adding and retrieving items based on the keys allows for a particularly quick search process. Instead of parsing the table items one by one (in the worst case we would have to go through all the items), and instead of looking for a value with a binary search (in which case we would have to go through a number of items which would depend on the logarithm of the table size), we can look at only one table index and check whether a value is mapped to that index.
HashMap uses the Object class hashCode() method to find a key value. Every HashMap subclass will inherit the hashCode() method. However, we will not go deep into HashMap workings in this course. We will return to inheritance in week 10.
Java's HashMap class encapsulates - or hides - the way it works, and it returns made-up methods ready to use.
When we create a HashMap we need two type parameters, a type for the key variable, and a type for the stored object. The following example uses a String-type object as key, and a String-type object as the stored object.
HashMap<String, String> numbers = new HashMap<String, String>();
numbers.put("One", "Yksi");
numbers.put("Two", "Kaksi");

String translation = numbers.get("One");
System.out.println(translation);

System.out.println(numbers.get("Two"));
System.out.println(numbers.get("Three"));
System.out.println(numbers.get("Yksi"));
Yksi
Kaksi
null
null
In the example, we create a HashMap where both the key and the stored object are strings. We add information to the HashMap with the put() method, which receives the references to the key and to the stored object as parameter. The method get() returns either the reference to the key given as parameter or a null value in case the key was not found.
Each key is mapped to one value, within the HashMap. If we store a new value with an already existing key, the old value is lost.
HashMap<String, String> numbers = new HashMap<String, String>();
numbers.put("One", "Yksi");
numbers.put("Two", "Kaksi");
numbers.put("One", "Uno");

String translation = numbers.get("One");
System.out.println(translation);

System.out.println(numbers.get("Two"));
System.out.println(numbers.get("Three"));
System.out.println(numbers.get("Yksi"));
Because the key "One" is assigned a new value, the print output of the example is like the following.
Uno
Kaksi
null
null
Nicknames
Create a HashMap<String,String> object in the main method. Store the following people's names and nicknames into the HashMap, the name being the key and the nickname its value. Use only lower case letters.
- matti's nickname is mage
- mikael's nickname is mixu
- arto's nickname is arppa
Then, retrieve mikael's nickname and print it.
The tests require you write lower case names.
Book Search through HashMap
Let us go deeper into HashMap workings with the help of the following example. Books can be retrieved based on their name, which acts as book key. If we find a book for the given name, we obtain the respective reference, as well as the book details. Let us create the example class Book, which has a name and the book contents as object variables.
public class Book {
    private String name;
    private String contents;
    private int publishingYear;

    public Book(String name, int publishingYear, String contents) {
        this.name = name;
        this.publishingYear = publishingYear;
        this.contents = contents;
    }

    public String getName() {
        return this.name;
    }

    public void setName(String name) {
        this.name = name;
    }

    public int getPublishingYear() {
        return this.publishingYear;
    }

    public void setPublishingYear(int publishingYear) {
        this.publishingYear = publishingYear;
    }

    public String getContents() {
        return this.contents;
    }

    public void setContents(String contents) {
        this.contents = contents;
    }

    public String toString() {
        return "Name: " + this.name + " (" + this.publishingYear + ")\n"
                + "Contents: " + this.contents;
    }
}
In the following example, we create a HashMap which makes use of the book name - a String-type object - and stores the references which point to Book-objects.
HashMap<String, Book> bookCollection = new HashMap<String, Book>();
The HashMap above has a String object as key. Let us extend our example so that we would add two books to our book collection, "Sense and Sensibility" and "Pride and Prejudice".
Book senseAndSensibility = new Book("Sense and Sensibility", 1811, "...");
Book prideAndPrejudice = new Book("Pride and Prejudice", 1813, "....");

HashMap<String, Book> bookCollection = new HashMap<String, Book>();
bookCollection.put(senseAndSensibility.getName(), senseAndSensibility);
librabookCollectionry.put(prideAndPrejudice.getName(), prideAndPrejudice);
Books can be retrieved from the book collection based on their name. A search for the book "Persuasion" does not return a corresponding entry, in which case the HashMap returns a null reference. However, the book "Pride and Prejudice" was found.
Book book = bookCollection.get("Persuasion");
System.out.println(book);
System.out.println();
book = bookCollection.get("Pride and Prejudice");
System.out.println(book);
null

Name: Pride and Prejudice (1813)
Contents: ...
HashMaps are useful when we know the key to use for our search. Keys are always unique, and it is not possible to store more than one object together with one key alone. The object which we store can still be a list or another HashMap, of course!
Library
The problem with the book collection above is that we must remember the correct book name when we search for it, character by character. Java built-in String class provides us the tools for this. The toLowerCase() method turns a string's characters to lower case, and the trim() method deletes the white spaces at the beginning and at the end of the string. Computer users tend to write white spaces at the beginning or end of a text, involuntarily.
String text = "Pride and Prejudice ";
text = text.toLowerCase(); // the text is now "pride and prejudice "
text = text.trim() // the text is now "pride and prejudice"
Let us create the the class Library, which encapsulates a HashMap containing books, and allows for book search regardless of its spelling. Let us add the methods addBook(Book book) and removeBook(String bookName) to our Library class. It's already clear that we would need various different methods to clean a string. Therefore, we can create a separate method called private String stringCleaner(String string).
public class Library {
    private HashMap<String, Book> collection;

    public Library() {
        this.collection = new HashMap<String, Book>();
    }

    public void addBook(Book book) {
        String name = stringCleaner(book.getName());

        if(this.collection.containsKey(name)) {
            System.out.println("The book is already in the library!");
        } else {
            collection.put(name, book);
        }
    }

    public void removeBook(String bookName) {
        bookName = stringCleaner(bookName);

        if(this.collection.containsKey(bookName)) {
            this.collection.remove(bookName);
        } else {
            System.out.println("The book was not found, you can't remove it!");
        }
    }

    private String stringCleaner(String string) {
        if (string == null) {
            return "";
        }

        string = string.toLowerCase();
        return string.trim();
    }
}
We implement our search functionality so that we can retrieve a book using a hash algorithm based on the book name.
    public Book getBook(String bookName) {
        bookName = stringCleaner(bookName);
        return this.collection.get(bookName);
    }
The method above returns the wanted book when this is found, otherwise it returns a null value. We can also also go through all the collection keys one by one, and look for the beginning characters of the book's name. In this way, we would actually fail to capitalise on HashMap performance speed because, in the worst case, we would need to go through all the book names. Search based on the beginning characters of a string is possible through the keySet() method. The keySet() method returns a set of keys, which can be parsed with the for each loop.
    public Book getBookUsingItsBeginningCharacters(String beginning) {
        beginning = stringCleaner(beginning);

        for (String key: this.collection.keySet()) {
            if (key.startsWith(beginning)) {
                return this.collection.get(key);
            }
        }

        return null;
    }
Let's leave the method above out of our library for now. Our library is still lacking an essential feature concerning book addition. Let us create the method public ArrayList<Book> bookList(), which returns a list of the books in our library. The method bookList() makes use of the values() method, which is provided by HashList. The values() method returns a set of our library books, which can be given as parameter to the constructor of an ArrayList class.
public class Library {
    private HashMap<String, Book> collection;

    public Library() {
        this.collection = new HashMap<String, Book>();
    }

    public Book getBook(String bookName) {
        bookName = stringCleaner(bookName);
        return this.collection.get(bookName);
    }

    public void addBook(Book kirja) {
        String name = stringCleaner(book.getName());

        if(this.collection.containsKey(name)) {
            System.out.println("The book is already in the library!");
        } else {
            this.collection.put(name, book);
        }
    }

    public void removeBook(String bookName) {
        bookName = stringCleaner(bookName);

        if(this.collection.containsKey(bookName)) {
            this.collection.remove(bookName);
        } else {
            System.out.println("The book was not found, you can't remove it!");
        }
    }

    public ArrayList<Book> bookList() {
        return new ArrayList<Book>(this.collection.values());
    }

    private String stringCleaner(String string) {
        if (string == null) {
            return "";
        }

        string = string.toLowerCase();
        return string.trim();
    }
}
Among the programming principles, there is the so called DRY principle (Don't Repeat Yourself), according to which we try to avoid having code repeat in different places. Turning a string to lower case, and its trimming - removing white spaces from the beginning and the end of a string - would have ocurred several different places without the stringCleaner() method. We might hardly notice we are repeating the same code as we are writing. It is only afterwards we may see the repeated code has snuck in there. That the repetition happens is not in itself bad, however. The most important thing is that we clean our code as soon as we notice the need.
Original-Type Variables in a HashMap
Both HashMap keys and stored objects are reference-type variables. If we want to use an original-type variable as key or stored value, we can use their reference-type equivalent. Some are introduced below.
| Original-type | Reference-type equivalent |
|---|---|
| int | Integer |
| double | Double |
| char | Character |
In fact, Java automatically encapsulates original-type values and translates them into reference-type values when needed. Even though the number 1 is an original-type variable, it can be used as an Integer key directly in the following way.
HashMap<Integer, String> table = new HashMap<Integer, String>();
table.put(1, "Be!");
In Java, the automatic translation of original-type variables into reference-type ones is called auto-boxing, i.e. allocation into a slot. The same process also works in the opposite way. We can create a method which returns a HashMap containing an Integer. In the following example, the automatic translation happens inside the method addTwitch.
public class TwitchRegister {
    private HashMap<String, Integer> twitched;

    public NumberBookkeeping() {
        this.twitched = new HashMap<String, Integer>();
    }

    public void addTwitch(String name, int number) {
        this.twitched.put(name, number);
    }

    public int lastTwitch(String name) {
        this.twitched.get(name);
    }
}
Even though the HashMap contains Integer objects, Java can also translate certain reference-type variables into their original-type equivalent. For instance, Integer objects can be translated into int values, if needed. However, this can be misleading! If we try to translate a null reference into a number, we receive the java.lang.reflect.InvocationTargetException error. When we make use of this automatic translation, we have to be sure that the value we want to translate is not null. The above lastTwitch method must be fixed in the following way.
    public int lastTwitch(String name) {
        if(this.twitched.containsKey(name) {
            return this.twitched.get(name);
        }

        return 0;
    }
Promissory Note
Create the class PromissoryNote with the following functionality:
- the constructor
public PromissoryNote()creates a new promissory note - the method
public void setLoan(String toWhom, double value)which stores the information about loans to specific people. - the method
public double howMuchIsTheDebt(String whose)which returns the entity of the debt held by the parameterperson
The class can be used in the following way:
  PromissoryNote mattisNote = new PromissoryNote();
  mattisNote.setLoan("Arto", 51.5);
  mattisNote.setLoan("Mikael", 30);

  System.out.println(mattisNote.howMuchIsTheDebt("Arto"));
  System.out.println(mattisNote.howMuchIsTheDebt("Joel"));
The example above would print:
51.5
0
Be careful in a situation where you ask for the debt of a person who hasn't got debts. Go back to the final example of section 36.3, if you need!
Attention! The promissory note does not need to take into account old loans. When you set a new debt to a person who has an old one, the old one is canceled.
  PromissoryNote mattisNote = new PromissoryNote();
  mattisNote.setLoan("Arto", 51.5);
  mattisNote.setLoan("Arto", 10.5);

  System.out.println(mattisNote.howMuchIsTheDebt("Arto"));
10.5
Dictionary
In this exercise, we implement a dictionary which can be used to retrieve the English translation of Finnish words. We implement our dictionary using the HashMap data structure.
Class Dictionary
Create a class called Dictionary. The class has the following methods:
-
public String translate(String word), returning the translation of its parameter. If the word is unknown, it returns null. -
public void add(String word, String translation), adding a new translation to the dictionary
Implement the class Dictionary so that it contained only one object variable, a HashMap data structure.
Test your Dictionary:
    Dictionary dictionary = new Dictionary();
    dictionary.add("apina", "monkey");
    dictionary.add("banaani", "banana");
    dictionary.add("cembalo", "harpsichord");

    System.out.println(dictionary.translate("apina"));
    System.out.println(dictionary.translate("porkkana"));
monkey
null
Amount of Words
Add the method public int amountOfWords(), which returns the amount of words in the dictionary.
    Dictionary dictionary = new Dictionary();
    dictionary.add("apina", "monkey");
    dictionary.add("banaani", "banana");
    System.out.println(dictionary.amountOfWords());

    dictionary.add("cembalo", "harpsichord");
    System.out.println(dictionary.amountOfWords());
2
3
Listing All Words
Add the method public ArrayList<String> translationList() to your dictionary, returning strings which stand for a content list of your dictionary in the form key = value.
    Dictionary dictionary = new Dictionary();
    dictionary.add("apina", "monkey");
    dictionary.add("banaani", "banana");
    dictionary.add("cembalo", "harpsichord");

    ArrayList<String> translations = dictionary.translationList();
    for(String translation: translations) {
        System.out.println(translation);
    }
banaani = banana
apina = monkey
cembalo = harpsichord
Hint: you can go through all HashMap keys using the method keySet in the following way:
    HashMap<String, String> wordPairs = new HashMap<String, String>();

    wordPairs.put("monkey", "animal");
    wordPairs.put("South", "compass point");
    wordPairs.put("sauerkraut", "food");

    for ( String key : wordPairs.keySet() ) {
        System.out.print( key + " " );
    }

    // prints: monkey South sauerkraut
The Beginning of a Text User Interface
In this exercise, we also train creating a text user interface. Create the class TextUserInterface, with the following methods:
- the constructor
public TextUserInterface(Scanner reader, Dictionary dictionary) -
public void start(), which starts the interface.
The text user interface stores into two object variables the reader and dictionary it has received as constructor parameters. You don't need other object variables. The user input must be read using the reader object received as constructor parameter! The translations also have to be stored into the dicitonary object received as constructor parameter. The text user interface must not create new objects itself!
Attention: This means The text user interface must not create a scanner itself but it must use the scanner received as parameter to read the user input!
At the beginning, in the text user interface must only have the command quit, to quit the text user interface. If the user inputs something else, we print "Unknown statement".
    Scanner reader = new Scanner(System.in);
    Dictionary dict = new Dictionary();

    TextUserInterface ui = new TextUserInterface(reader, dict);
    ui.start();
Statement:
  quit - quit the text user interface

Statement: help
Unknown statement

Statement: quit
Cheers!
Adding and Translating Words
Add the methods add and translate to your text user interface. The command add asks for a word pair from the user and adds them to the dictionary. The command translate asks a word from the user and it prints the translation.
    Scanner reader = new Scanner(System.in);
    Dictionary dict = new Dictionary();

    TextUserInterface ui = new TextUserInterface(reader, dict);
    ui.start();
Statements:
  add - adds a word pair to the dictionary
  translate - asks a word and prints its translation
  quit - quits the text user interface

Statement: add
In Finnish: porkkana
Translation: carrot

Statement: translate
Give a word: porkkana
Translation: carrot

Statement: quit
Cheers!
Towards Automatic Tests
Testing a program manually is a hopeless burden. It is possible to automate inputs by setting up a string as a Scanner object parameter. The example below shows how it is possible to test automatically the program above.
    String input = "translate\n" + "monkey\n"  +
                   "translate\n" + "cheese\n" +
                   "add\n"  + "cheese\n" + "juusto\n" +
                   "translate\n" + "cheese\n" +
                   "quit\n";

    Scanner reader = new Scanner(input);
    Dictionary dictionary = new Dictionary();

    TextUserInterface ui = new TextUserInterface(reader, dictionary);
    ui.start();
The print output contains only the program output, and not the user commands.
Commands:
  add - adds a word couple to the dictionary
  translate - asks for a word and prints its translation
  quit - stops the user interface

Command: Give word: Unknown word!

Command: Give word: Unknown word!

Command: In Finnish: Translation:
Command: Give word: Translation: juusto

Command: Cheers!
Giving a string to a Scanner class is a way to replace the String inputs given through the keyboard. The contents of the String variable input "simulates" the user input. \n denotes a line break. Each single part of the input variable which ends with a line break corresponds to one nextLine() input.
It is easy to change the text input, and we can add new words to our dictionary in the following way:
    String input = "add\n"  + "cheese\n" + "juusto\n" +
                   "add\n"  + "bier\n" + "olut\n" +
                   "add\n"  + "book\n" + "kirja\n" +
                   "add\n"  + "computer\n" + "tietokone\n" +
                   "add\n"  + "auto\n" + "car\n" +
                   "quit\n";
If you want to test again your program manually, change the Scanner object constructor parameter into System.in, i.e system input stream.
The program functionality must be checked from the output pane, still. The result can still be confusing at the beginning, because the automatic input does not appear in the output pane at all.
The final goal will be to also automate the testing the program's functionality, so that both testing the program and analising its output text would happen successfully in one click.
Java API
The Java programming language we use in our course is made of three things. The first is the program syntax and semantics: the way we define variables, the control flow, the variable and class structure, and their functionality. The second is JVM, i.e. Java Virtual Machine, used for running our programs. Our Java programs are translated into a bytecode, which can be run on whatever computer has JVM. We haven't dealt with program translation because the program environment does it on our behalf. Sometimes, if the program environtment does not work as expected we may have to choose clean & build, which deletes the old source code and translates our program again. The third is API (Application Programming Interface), that is to say the program interface or standard library.
API is a set of built-in classes specific of the programming language, which is provided to users for their own projects. For instance the casses ArrayList, Arrays, Collections, and String are all part of Java's build-in API. A description of the API of Java 7 can be found at the address http://docs.oracle.com/javase/7/docs/api/. On the left side of the page we find a description of Java's built-in classes. If you look for the ArrayList class, you find a link to http://docs.oracle.com/javase/7/docs/api/java/util/ArrayList.html, which shows the stucture, constructors, and methods of the class.
NetBeans is able to show a class API, if needed. If you write a class name and add the relative import sentence, you can right click on the class name and and choose Show Javadoc. This opens the class API description in your browser.
Airport
Every week, you will find one or more larger exercises, where you can design freely the program structure, the appearance of the user interface and the requred commands are predefined. The first exercise which you can design freely in Advanced Programming is Airport.
Attention: you can create only one Scanner object so that your tests would work well. Also, do not use static variables, the tests execute your program many different times, and the static variable values left from the previous execution would possibly disturb them!
In the airport exercises we create an application to manage an airport, with its airplanes and flights. As far as the planes are concerned, we always know their ID and capacity. As for the flights, we know the flight plane, the know the departure airport code (for instance HEL) and the destination airport code (for instance BAL).
There can be various different flights and planes. The same plane can also go on various different flights (various different routes). The application must offers two different panels. First, the airport worker inputs the flight and plane information to the system.
When the user exits the panel, the user can use the flight service. The flight service has three actions: printing planes, printing flights, and printing user airplane information. In addition to this, the user can exit the application by choosing x. If the user inputs an invalid command, the command is asked again.
Airport panel
--------------------

Choose operation:
[1] Add airplane
[2] Add flight
[x] Exit
> 1
Give plane ID: HA-LOL
Give plane capacity: 42
Choose operation:
[1] Add airplane
[2] Add flight
[x] Exit
> 1
Give plane ID: G-OWAC
Give plane capacity: 101
Choose operation:
[1] Add airplane
[2] Add flight
[x] Exit
> 2
Give plane ID: HA-LOL
Give departure airport code: HEL
Give destination airport code: BAL
Choose operation:
[1] Add airplane
[2] Add flight
[x] Exit
> 2
Give plane ID: G-OWAC
Give departure airport code: JFK
Give destination airport code: BAL
Choose operation:
[1] Add airplane
[2] Add flight
[x] Exit
> 2
Give plane ID: HA-LOL
Give departure airport code: BAL
Give destination airport code: HEL
Choose operation:
[1] Add airplane
[2] Add flight
[x] Exit
> x

Flight service
------------

Choose operation:
[1] Print planes
[2] Print flights
[3] Print flight info
[x] Quit
> 1
G-OWAC (101 ppl)
HA-LOL (42 ppl)
Choose action:
[1] Print planes
[2] Print flights
[3] Print flight info
[x] Quit
> 2
HA-LOL (42 ppl) (HEL-BAL)
HA-LOL (42 ppl) (BAL-HEL)
G-OWAC (101 ppl) (JFK-BAL)

Choose operation:
[1] Print planes
[2] Print flights
[3] Print flight info
[x] Quit
> 3
Give plane ID: G-OWAC
G-OWAC (101 ppl)

Choose operation:
[1] Print planes
[2] Print flights
[3] Print flight info
[x] Quit
> x
Attention: for the tests, it is essential that the user interface works exactly as displayed above. In fact, it is a good idea to copy-paste the menus printed by the above program into your code exactly. The tests do not require that your program should be prepared to deal with invalid inputs. This exercise is worth three single excercise points.
The program must start by executing the main method in the exercise layout.
Still another remark: in order to make your tests work, your program has to create only one Scanner object. Also, avoid using static variables: the tests execute your program many different times, and the static variable values left from the previous execution would possibly disturb them!
 java.lang.String