Set radius and box size. This can be done in two ways. If you
already
know the radius of a particle (in pixels), you will click on the group name to activate it, you
will then see that two tabs at the bottom of "Files" frame have become active. Suppose you know
that radius of you particles is 40 pixels. Eneter this number into the Radius tab. A good
choice of box size is usually the diameter of the particle plus few pixels, say 90. In no case
should the box size be less then twice the radius. Enter the appropriate value in the
"Box" tab.
If the radius of the particle is not known apriori, it will have to be determined from one of
the micrographs. Click for example on 1.mrc, you will see that the "eye" button in the center
of main window was become active, press it. You will see a new window displaying the given
micrograph. If the micrograph is large you might have to zoom in, to find a particle that is
well represebtative of the others. In order to zoom, click on the "looking glass" button on the
left side of the micrograph. Then select a region of the micrograph by first cliking upper left
corner, hold the mouse button down and drag it to the right bottom corner, when it is done
relese mouse botton. Remeber that the micrograph viewer will not zoom closer then 1:1 with the
screen resolution. If you want to jump imeddiately to closest possible view press "1:1" button
in the "Zoom & Pan" frame. When you think the view of particles is good, select the
radius. Press the "radius" button (located just below the "looking glass" button), position
mouse cursor on the outer edge of one particle. Press and hold mouse button, drag it so that
the green circle exactly covers the particle, release the button. You will now see that in
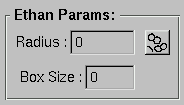
"Radius" tab, in "Ethan Params" frame there appeared a value, this is the radius of the circle
you have just produced in pixels. Now you have to set the box size. This procedure is similar
to setting the radius. Press "box" button (located under radius button) then drag the box above
one of the particles so that it covers the whole particle. Notice that the box size is now set
in the "Ethan Params" frame. You can change box size and radius any number of times. When you
are satisfied with the values, clock "close" button int he upper right corner of the window.

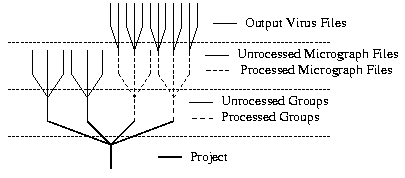
 A project consists of groups. Groups contain micrographs with similar
parameter values: approximate virus size, and cutout box. A group can
have
zero or more micrograph files. A project can have several groups, each
of which should have their own parameter values. Thw user can select the
peremeter values of the group either from previous experience or by
inspecting one of the micrographs on the screen. When processing the
group, SPADE extracts each particle from a micrograph to its own file.
The user can examine the particle files and delete unacceptible ones.
It is
helpful to think of a project as of a tree, where groups are branches
of project, micrographs are branches of groups and finally individual
virus particle files are branches of micrographs.


 When large '+' button is pressed it
opens up this
window, where a name for a new group can be put in. There is only one
basic restriction to this operation, it is not allowed to have two groups
with same name. Ant printable characters can be used, including spaces in
the name of a group.
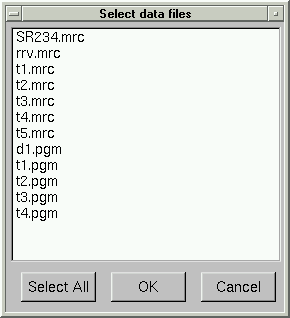
 When small '+' button is pressed it opens up this window. It lists all
data (.mrc and .pgm) files that are located in current data directory.
One or more (with shift key) files can be selected, when 'OK' is hit
selected files enter a group which was previously selected in unprocessed
tree box. 'Select All' button will select all listed files. Same file
should not be included in a group more then once.
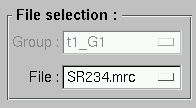
 This tab is designed to show clearly
which part of
the project a user is working with. Group output shows the name of
current group and it cannot be changed in this window. In order to change
the group, close micrograph window, select a file form desired group and
click visualize button.
 Two ethan parameters, radius and box
size are shown here. They are set using the toolbox. Once radius has
been set ethan can be test ran by clicking the button in this tab. When
this button is clicked for the first time for a given micrograph, ethan is
ran. It finds the particles in the micrograph, and shows them on as red
circles. It is possible to see how well ethan works with different radius
parameter. Test run is a toggle button, to remove red circles that show
found particles click the button up. When user clicks this button down
again, ethan is not run, results of previous run are used to draw
particles.
 Often micrographs are fairly large in size, so in order to see the whole
micrograph in a window it has to be scaled down to fit the size of the
window. In this view it might be difficult to set particle radius
precisely because particles appear much smaller because of down-scaling. In
order to examine micrograph closely and set radius more precisely it is
possible to zoom in to a desired area. Two buttons in this tab, set zoom
value. 1:1 button sets screen resolution to that of the image, so each one
pixel on the screen actually corresponds to exactly one pixel in the
micrograph. Fit to screen is the other button and it is used to shrink
the image to fit the window. When only a part of the image is displayed,
user may want to see what the micrograph looks like in the regions
neighbouring to the one being displayed. The for arrow buttons are used to
scroll micrographs.
 Looking glass '+' mode button sets custom zoom mode. Once this
button is down, select upper left corner (by pressing and holding left
mouse button) of the area of the micrograph
that you want to see closer, then drag the mouse (with left button down)
and and release the mouse button to set
the bottom right corner of the area. After that the area is enlarged to
fit current display. It may happen that the resolution of the enlarged
image is greater that that of the micrograph, in this case only upper left
corner is used, and current display is filled with image at resolution of
the micrograph. The screen resolution can never be higher then micrograph
resolution.
 This tab has very similar in functionality to file selection tab in
micrograph window. Group text output shows name of the current group,
and the file chooser changes the source micrograph.
 All found particles are shown as
buttons in the Map box. Particles scheduled for deletion are moved to
delete box, this is done to make sure that none of the good files are
deleted. It gives user a chance to look over all particles that will be
deleted.
 Using these two buttons particle files can be moved between maps and
delete boxes. First user has to select the particles that need to be
moved, this is done by clicking on each them. After that the selected
particles can be moved by pressing one of the arrow buttons. If particles
are moved from map to delete box then right '->' arrow should be pressed.
If particles are returned from delete box to maps box then left '<-' arrow
buttonī should be pressed.
 Delete button removes all particles currently in the delete box and also
all files they represent. Since a name of the file consists of its serial
number, certain filename manipulation are done to keep the list
continuous.